Machine-translated page for increased accessibility for English questioners.

Stratus.FI is a private cloud for FI users built on OpenNebula software.
It can be used as an environment for experimentation and quick testing, but also for production use of software that for various reasons cannot be installed directly on CVT FI managed servers (such as Anxur or Aisa). We also provide support for its mass use for teaching purposes.
At the request of, we can also create a group of people in Stratus.FI that can be populated manually or synchronized with a group in the Faculty Administration (see groups in GitLab for a rough inspiration). This can then be an ownership group for machines or other resources.
Contents
- Quotas and usage rules
- Login
- Cloud versus User view
- Configuring user context
- I want to quickly create a preinstalled virtual machine
- Production virtual machines
- I want to install my operating system
- XML-RPC API (Terraform, etc.)
- Hardware
- Links
Quotas and usage rules
Our goal is to allow users to use larger amounts of computing resources (up to about 10 virtual machines ) on a short-term basis. Users will thus be able to try out distributed applications, for example. The quotas for system resources are therefore set for this type of use. Exact information about the quotas can be found in the web interface in the user settings in the Quotas section, or in the Faculty administration application Overview of personal information
Please be considerate of other users: the current hardware does not have the capacity for every FI user to use all resources up to the size of their quota at one time on a consistent basis. Therefore, the set quotas do not apply to permanently running virtual machines. If we detect virtual machines running for more than a day, or at most small units of days, we will terminate these machines and later terminate their disks as well.
If you need a test virtual machine running for a longer period of time, a production virtual machine, a short-term overage of computing resources, or are considering
using Stratus.FI for teaching, please contact the system administrator at
unixabR9Aa8DX@fiGl6gd3CBc.muniI=N1AOsqO.cz.
When using virtual machines, keep in mind that the Operating Rules apply here as well, especially the prohibition on running publicly available network services without prior approval from the CVT FI manager.
VCPU vs CPU: When allocating resources to a virtual machine, two parameters are set, among others: the VCPU and the CPU. The integer parameter VCPU means how many processors the virtual machine will see, i.e. how many cores the host machine will be able to distribute its work on. The real CPU parameter is less important - it is used as information about roughly how much computing capacity this VM will take up on average in the long run. In short: if you only need bursty parallel performance, set only VCPU. On the same and on RUNNING quota variants, see also DYK in our blog.
Login
The Stratus.FI cloud web interface can be found at the following URL:
https://stratus.fi.muni.cz/
Log into the web interface with your faculty login and faculty password (more about faculty accounts and changing your password here).
Cloud versus User view
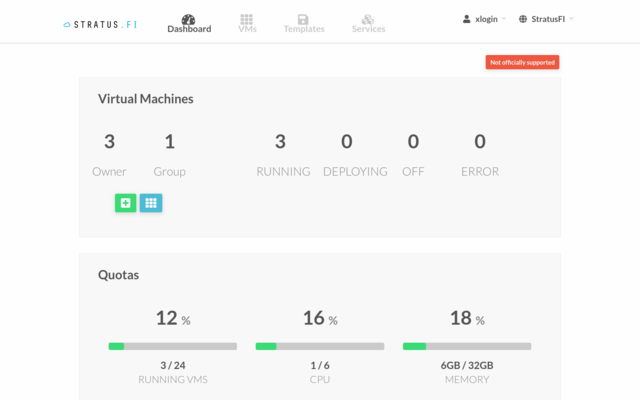
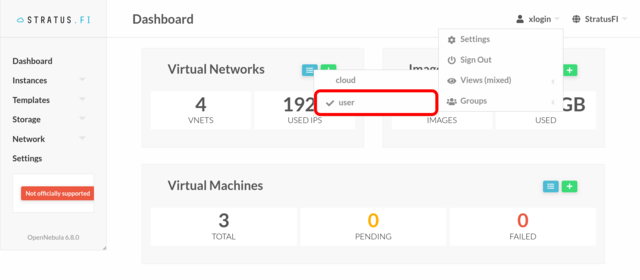
The Stratus.FI web interface is available to users in two versions: a simpler cloud view, which is set up by default and described in the section I want to quickly create a virtual machine, and a more complex user view with a menu on the left and multiple controls. You can switch between them by clicking on the user's name and selecting the last item called Views. Compare - cloud view:
... and user view:
Configuring the user's context
The pre-installed virtual machine images are configured to take some information from the user settings (SSH key, superuser password, ...). Therefore, before actually creating the virtual machine, these parameters need to be set. Log in to the web interface, click on the user name in the top right and select Settings from the menu:

SSH key for root account
If you don't already have one, create an SSH key, for example on Aise, with the command:
ssh-keygen -b 4096 -t rsa
The secret key will be saved in the file
$HOME/.ssh/id_rsa and the public key will be saved in the same file
id_rsa.pub. When you create it, you can enter a password
(passphrase) that will be required each time you use the SSH key.
In the web interface, in the user settings, click on the Config section, then Add SSH Key, and copy the
public key - the contents of the
id_rsa.pub file - into the form window with your mouse.

The encrypted password for the root account
Create an encrypted form of the password for the virtual machine, for example by running
openssl passwd -1 on Aise or another Linux machine:
xnekdo@aisa$ openssl passwd -1
Password: correct horse battery staple
Retype password: correct horse battery staple
$1$t2DaE4vm$i8A...630
xnekdo@aisa$
In the user settings in the Stratus.FI web interface (you need to be in
user view), add a new attribute at the very bottom of the
Attributes section called
CRYPTED_PASSWORD, the value you created above (the string
$1$...) and save by clicking
[+].
Note: the newer pre-installed images do not allow password login when logging in via SSH as root, so you will only be able to use the password you choose when logging in via VNC.
Password for Windows VM
To use a Windows virtual machine, you need to add two additional attributes to the user attributes (you need to be in
user view):
USERNAME with the user's login name and
PASSWORD containing an
unencrypted password for logging in. Here we recommend choosing a different password than you use on faculty systems.
Choose a non-trivial password, otherwise Windows may refuse to log into the VM with a too simple password.
Overall, the set contextual information looks something like this (user view):

I want a preinstalled virtual machine
Use the following procedure if you need to try something on an already installed machine (run/compile your version of some software, etc.) and don't want to waste time installing and configuring the operating system.
Configure the user context as described in the previous chapter.
Open the main Stratus.FI page (from another Stratus.FI page, click on Dashboard at the top).
On the left side of the page, click on the green
[+].
Choose from the menu of preinstalled systems (for example, AlmaLinux, Fedora, or Debian) and click on the selected system.
Note:
Templates with
[CVTFI] in the name owned by the account
oneadminare templates created by us, are intended for users, and should have contextualization packages installed, meaning they should have a working network and be able to log in as root with an SSH key (and VNC password) from the user's context. So if you run into any problems with a template labeled this way, feel free to contact us and we'll try to resolve it with you.
Note: If this will be a production virtual machine, choose the persistent option (see creating disks for more information). We also strongly recommend using a distribution with long support (e.g. AlmaLinux or Debian).
On the left side of the page, fill in the name of the virtual machine you are creating (for example, Test AlmaLinux) and click on the green Create on the right.
Wait until the name of the virtual machine you just created has a green square instead of an orange one (you can refresh the view by clicking the two arrows in a circle icon shown at the top right).
Once the virtual machine is active, you can try, for example, logging in via SSH to the IP address displayed for the virtual machine you created (if the template uses SSH contextualization, it has an SSH server and IP address) from within the FI network (for example, from Aisa, Anxura, Wi-Fi, or a faculty VPN; see also FI network access). You can get to the console of the machine by clicking on its title and then on the blue terminal icon in the bottom left that says VNC. You can log in as root with the password you entered earlier.
For newly instantiated machines, we recommend updating the packages, especially if you plan to use the machine for a longer period of time, and rebooting the machine to fully apply them.
Newly created virtual machines are assigned a NATted private IPv4 and public IPv6 address (but without Internet access enabled). You can read more about the technical solution in our ISe blog.
If you would like to use such a virtual machine more permanently and would need a larger disk, scaling up is possible, but the disk must be connected to the running virtual for this operation (you can scale up in the Storage tab).
Production virtual machines
Production virtual machines generally have higher requirements:
- Operation of a production virtual machine is subject to the approval of the FI staff member or PhD student.
- VM contextualization - Check or disable taking over VM configuration from virtualization settings, i.e. passwords, SSH keys or network settings.
- Monitoring - responsibility for running and monitoring is the responsibility of the machine owner, but we can provide monitoring via our Nagios upon request .
- Central log collection - set up logs to be sent to a central syslog.
- IPv6 - we strongly prefer the machine to run over IPv6 and have an IPv6 address in DNS.
- Need public IPv4? - Is it really necessary to have a public IPv4 address? If the machine will only communicate within the FI network or is mainly about hostname assignment, we will assign a private IPv4 address.
- For proper HTTPS configuration - see our guide.
- Updates - the machine needs to continue to be kept up to date. We recommend that you choose your running distribution (LTS) accordingly.
Content of the production VM request
- VM name and ID - the name and number of the virtual machine in Stratus.FI.
- Machine Hostname - the production machine will be given a name in the fi.muni.cz domain: write what you prefer, otherwise we will assign it.
- Services provided - what ports do you want to allow on the faculty firewall (UDP/TCP? from the whole internet, only from MU, only from FI?).
- IP change procedure - to actually assign a "production" IP address, unix@fi must change network interfaces to the virtual machine. Thus, there will be an outage and a change in the VM's network configuration. Please advise if this step needs to be coordinated in any way, or if the reconnection can occur at any time.
I want to install my operating system
In this section, we will assume that the user has the interface switched to User view.
Creating disks
For your virtual machine, you will need an installation media (CD-ROM image), a system disk, and possibly a volatile disk for temporary data such as swap space. You can view the available disks by clicking on Storage → Images in the left menu.
If you do not find the installation media of your chosen system among the available disks, you can create them:
- click on the green [+] at the top of the main page,
- fill in the name of the disk (for example, CentOS 7.1511 netinst.iso), and a description if necessary,
- select Read-only CD-ROM as the type and leave the storage (datastore) as cephds,
- under Image location, select Upload and find the ISO image on your computer,
- create the image by clicking on the green Create at the top.
The newly created disk should appear in the list of available disks. To save disk space, if possible, offer the ISO image you have created to other users: click on the appropriate line in the list of disks, and in the access rights on the right side of the page, add the Use right for Group and Other as well.
Similarly, create a system disk. On the Storage → Images page, click the green [+], fill in the name of the disk (for example, MujTest), and fill in a description if necessary. Select Operating System image as the type, leave cephds as the storage type. Important: check the checkbox This image is persistent. When the VM is deleted, the changes made are lost. Persistent image: can only be used by one VM, changes made are preserved even after VM cancellation.) Next, select Empty disk image as the source and specify the size. Complete the action by clicking on the green Create at the top of the page.
The virtual machine template
Stratus.FI (OpenNebula) uses templates to describe what the virtual machine should look like. Primarily, templates are intended for when you need to efficiently create multiple identical virtual machines, for example for load balancing. However, every virtual machine must have a template, even if we know in advance that it will only ever run in one instance.
Select Templates → VMs from the left menu to see a list of available templates (all your own and public foreign ones). Click the green [+] to create a new template. On the General tab, fill in the template name, default memory size, and processor information: the CPU entry specifies the power consumption of this virtual machine for the purpose of selecting the physical node where the machine will run. Because the machine is unlikely to take up the entire CPU 100% of the time, set the value to around 0.2. The VCPU entry tells the operating system how many processors the virtual machine will see. Set the value to 1. Leave the Hypervisor item at KVM.
Next, click the Storage tab at the top of the page (next to the General tab). Select (leave) the Image type as Disk 0 and select the disk created above from the list. To add another disk, use the blue (+). Select the installation CD-ROM as Disk 1. Similarly, you can add a Volatile disc, for example of the swap type. This disk is not a separate image, it is always created again when the template is instantiated. One of the appropriate uses is just swap space. If you will be installing Windows, you may also need to attach Virtio Windows drivers.
On the third tab, Network, you set up the network interfaces of the virtual machine. Plug the NIC 0 network card into the 503-usrpriv network.
The fourth tab, OS Booting, controls the order of the disks when the system boots. To install the operating system from a CD-ROM image, select that image first (check Boot from Disk 1 and use the arrow keys to move that disk up).
You don't need to set up anything else on the other tabs at this stage, just click on the green Create at the top of the page.
Start the virtual machine
Based on the template we have created, we can create (instantiate) a virtual machine. Select the appropriate template from the list by clicking on its row, and from the template detail page click on the blue Instantiate at the top. Here it is still possible to change some parameters for a specific instance, this is mainly used when customizing ready-made pre-installed images and templates. Just click on the green Instantiate at the top of the page.
The newly created virtual machine is visible in the list of virtual machines: Instances → VMs from the left menu. The assigned network addresses are also visible here. When installing a new system, set up the network statically; copy this information into the installer. For production VMs it is better to use contextualization packages that the system sets up itself, for example addon-context-linux, addon-context-windows.
The virtual machine console can be accessed by using the terminal icon on the right in the virtual machine list, or by using the terminal icon labeled VNC from the single virtual machine detail page. From here, you can proceed with the system installation.
After installation
Once the installation is complete, all you need to do is enable boot from disk. Shut down the installed virtual machine (the shutdown button at the top of the details page for that virtual machine, and then Undeploy). Then select the Conf tab on the far right, click on the green Update Configuration and change the boot order. Save the changes by clicking the green Update at the top of the page. You can then start the virtual machine by clicking the triangle button to the right ("Play", ⏵). Alternatively, a similar effect can be achieved by cancelling the virtual machine completely (the persistent disk remains), modifying the template and re-instantiating.
Useful configuration
Finally, we recommend checking the list of tips when installing a machine on FI. It contains useful advice both in general and advice on how to use some services specific to the faculty network.
XML-RPC API (Terraform, etc.)
More advanced users can also take advantage of the
XML-RPC API that the OpenNebula software provides. It is available from inside the FI network (e.g. from the Aisa server) via
https://stratus.fi.muni.cz:2634/. Authenticate with faculty credentials.
This API has support in several programming languages (see link above or see
Python) or perhaps in
Terraform. A minimalist example for the Python module is
pyone:
import pyone
from pprint import pprint

one = pyone.OneServer("https://stratus.fi.muni.cz:2634/RPC2", session = "filogin:fipasswd")
vminfo = one.vm.info(1234) # some virtual machine ID
pprint(vars(vminfo))
Hardware
Stratus.FI consists of three monitoring (control) nodes and thirteen guest nodes, which also provide storage via the Ceph distributed system. The nodes run the CentOS operating system.
To give an idea, the guest nodes are of two generations and have the following parameters:
- Two 64-thread AMD EPYC 75F3 processors running at 2950 MHz.
- Each core has 512 KiB L2 cache
- Each processor has 32 MiB of shared L3 cache
- Two 12TB rotating disks for Ceph
- They are connected to the network at 10 Gbit/s full-duplex
- 1 TiB RAM in sixteen 3200MHz modules
- Two 32-thread AMD EPYC 7351 processors running at 2400MHz
- Each core has 512 KiB L2 cache
- Each processor has 8 MiB of shared L3 cache
- Two 12TB rotating disks for Ceph
- They are connected to the network at 10 Gbit/s full-duplex
- 512 GiB RAM in sixteen 2400MHz modules
Links
- Stratus.FI web interface
- FI Technical Information
- FI computer systems operating rules
- OpenNebula Documentation
- addon-context-linux
- addon-context-windows